(note: this first appeared in August 2006 on the old blog)
Warning/Disclaimer: I’m neither a teacher nor am I versed in the theory behind AutoLisp programming. But I invite you to come along for a ride. This stuff is not only fun, but it can be useful ! Each lesson should take 5-10 minutes.
So, here we go…
Lesson 003 – Reusable Programs – Saving as an Executable File
In the first two lessons we were just typing and executing AutoLisp expressions from the command prompt. Now we’ll go the next step and create our first program saved as an “executable” file.
Here’s where we ended the last lesson: a single line AutoLisp expression that would display the block name of a picked block insert.
Today let’s take this one line expression, expand it a bit to make it more readable, and save it to an executable file. Then we can load and run this utility any time we want.
Let’s use the built-in Visual Lisp editor.
1. Type VLIDE [Enter] at your AutoCAD command line.
2. Select “File” > “New File” > “File” > “Save As” and give it a file name of BN.LSP
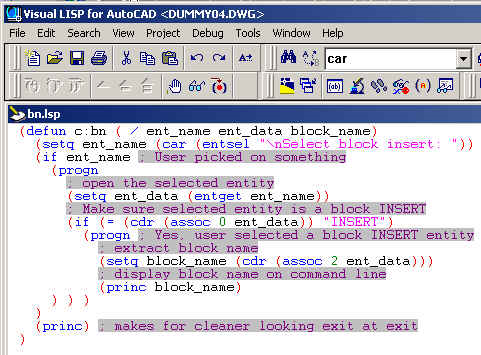
3. Now type in the code shown below starting with the line “(defun c:bn …. )”

OK. This “program” is pretty much the same as our original one-line expression we typed in at the command line. It’s just a bit cleaner and prettier looking, PLUS, we’ve saved it to a file so we can call it up and run it at any time.
Let’s test it and then we’ll talk a little bit about it…
4. Select “Tools” > “Load Text in Editor”. This loads your program.
5. Now let’s give it a test. Mouse back to the AutoCAD command window. Type BN [Enter] at the command prompt. This should execute your program. If all is well, you’ll see a “Select block insert:” prompt. Pick on a block insert and, hopefully, your program will execute to the end and display the insert’s block name.
Here’s the minimum information you should be aware of at this point:
a) The first line, “(defun c:bn…)” is where we’re defining our own custom command (function) called “bn”. The c: part has nothing to do with a drive on your computer, it means that this is an external command being defined.
b) Whenever you see a “setq” key word, this means that some variable is getting assigned some value. The variable name follows the setq key word and the value follows the variable name.
c) The “princ” keyword instructs the program to output to the command line whatever follows this keyword, whether it be a fixed text string, numeric value, or contents of some variable.
d) The number of open parenthesis ” ( ” and closed ones ” ) ” need to be balanced. If not, your program will not load or will choke when it runs.
There’s more but our 10 minutes are about gone… we have to hurry.
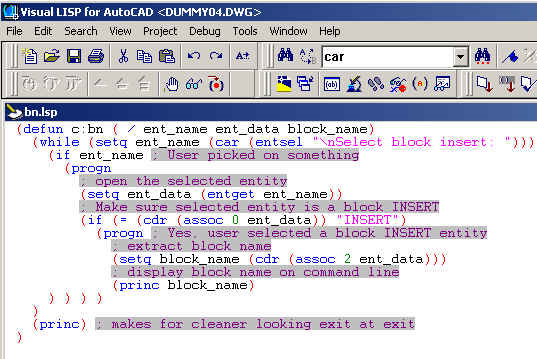
Our program runs one time and then quits. Let’s make a simple modification to make it “loop” around so we can keep picking. When we’re done, we can just pick in “empty space” or hit [ESC] key to quit.
So, here’s our modified program. We’ve added a “while” key word and added another set of parenthesis to keep everything balanced:

Now when we load and run it, it is a bit more useful.
Finally, let’s exit the Visual Lisp environment and try APPLOADing and running our new program. In other words, we do not need to invoke the Visual Lisp editor to run our program. We can just do a normal APPLOAD and off we go.
1. Exit Visual Lisp. Now you should be back at the AutoCAD command prompt.
2. Type APPLOAD and browse to your saved copy of bn.lsp. Load it.
3. Type BN at the command line. It should run, just like before…!
Okay, time’s up. Next lesson we’ll push a bit further into this fun stuff.

[…] previous postings: Lesson 001, Lesson 002, Lesson 003, Lesson 004, and Lesson […]
Pingback by Nate’s Simple AutoLISP – Lesson 006 « AutoCAD Electrical Etcetera — September 26, 2009 @ 4:58 pm